Open configuration field;
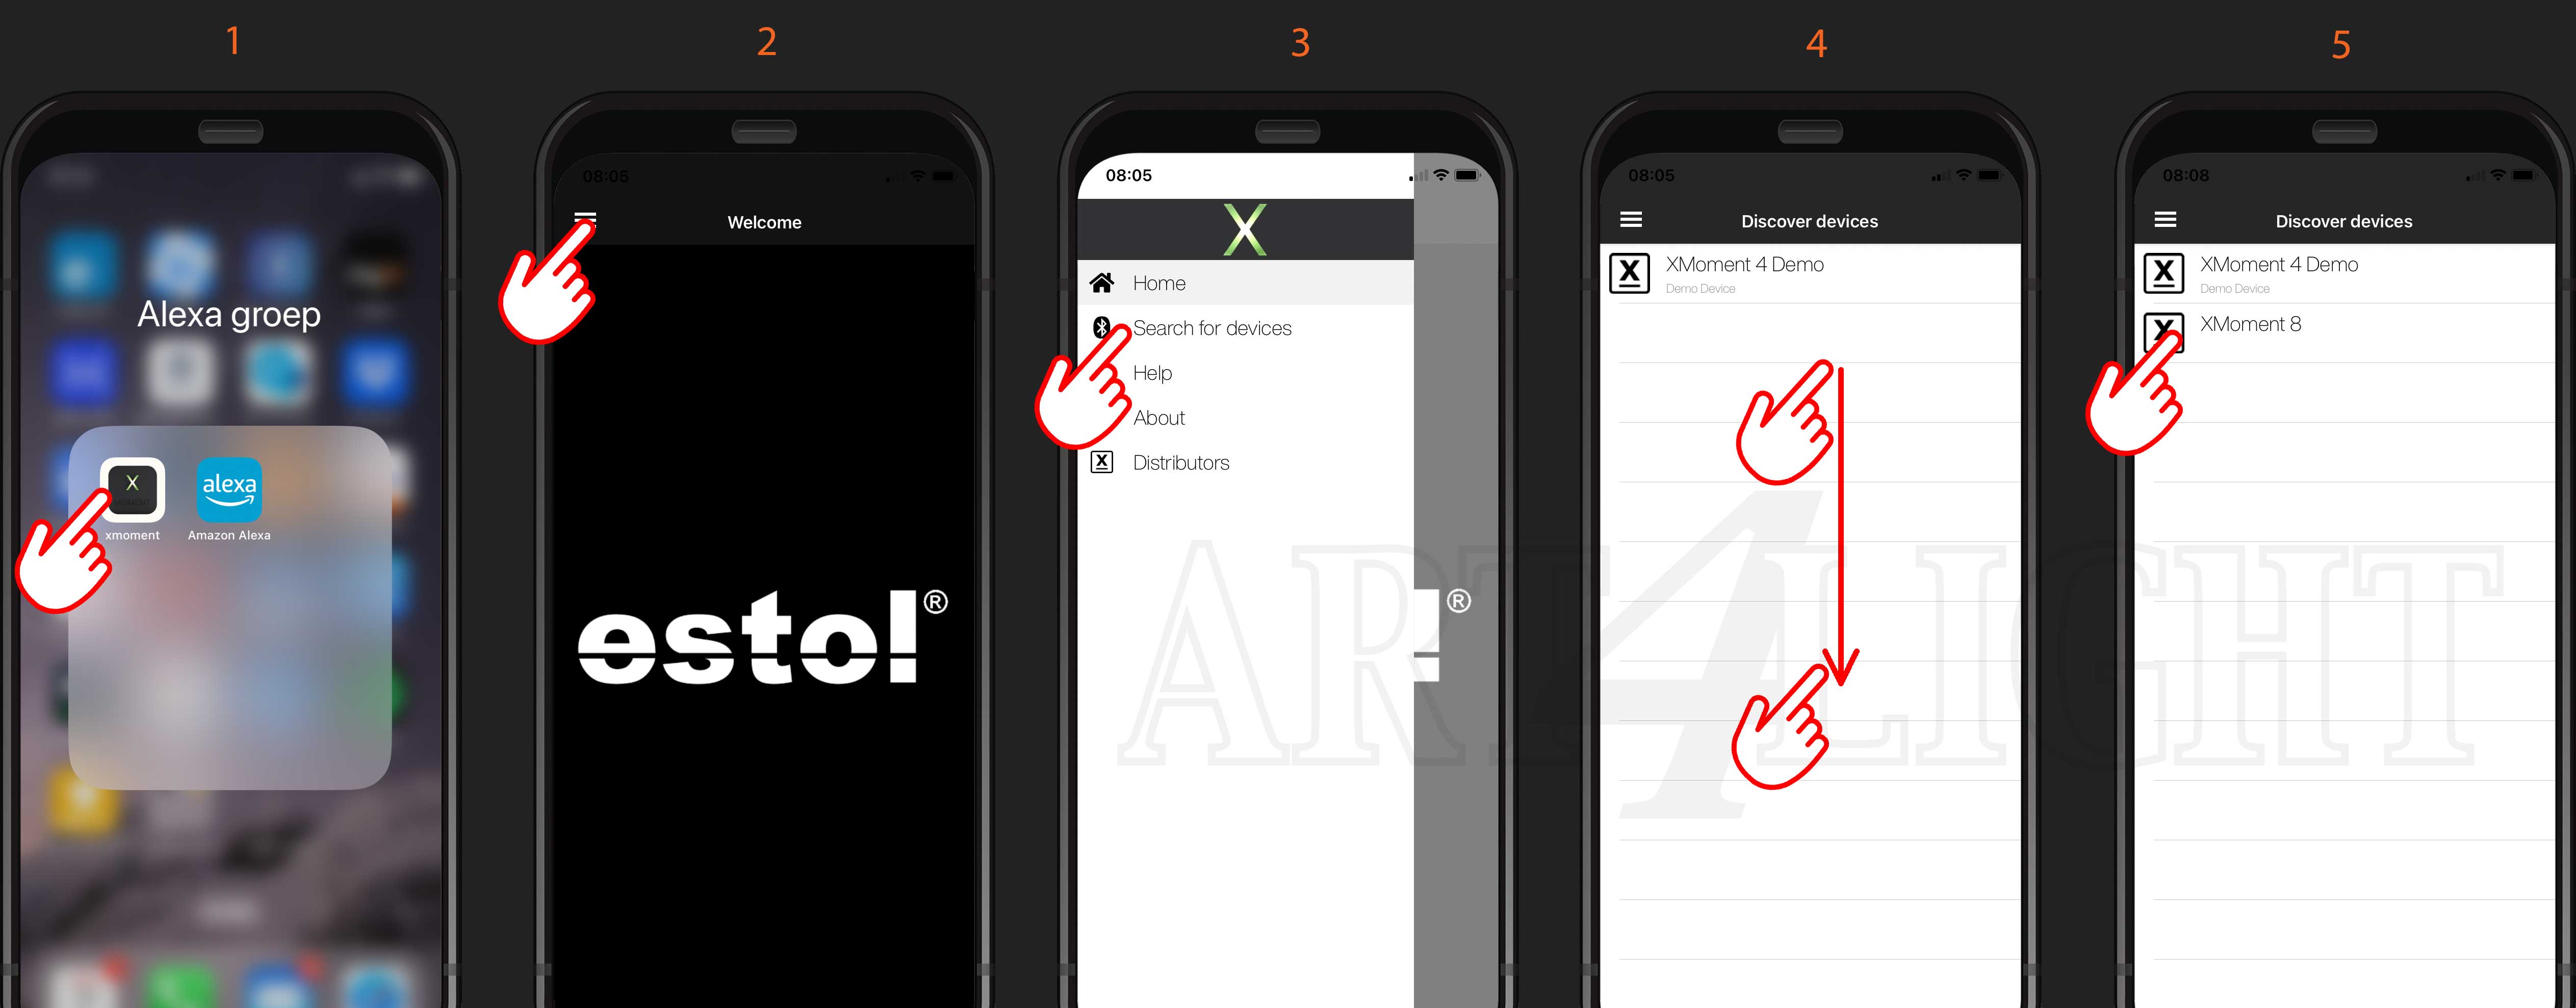
1) Download the free 'Xmoment app' and open it.
2) Click on the 'menu' symbol.
3) Click on 'Search for devices'.
4) By default there is an 'Xmoment 4 demo' available, if you don't see your own Xmoment, swipe the screen down and a new search will be started.
5) Click on your Xmoment, in this example an 'Xmoment 8'.
6) The 'Xmoment 8' is read and you proceed to 1 of the choices;
enter voice commands / configure wifi / reset to factory settings.

Connect Xmoment to your WiFi network
10) Xmoment flashes red if the Wifi has not been established.
11) Click on the 'Wi-Fi' symbol.
12) Click on 'Search for Wi-Fi'.
13) Click on your network (don't choose a guest network!).
14) Click in the line and enter your WiFi password (see the back of your modem).
15) Click 'Save'.
16) The data is stored in your Xmoment.
17) Click in the white field.
17) You will return to the main field.
19) Xmoment is now green (make sure it is within WiFi range)


Enter Xmoment voice commands
20) Click on the cloud at the bottom left.
21) Click in the first line and enter your voice command.
22) Click in the second line and enter your voice command.
23) Click in the third line and enter your voice command. (etc.)
24) Click on 'save'.
25) The data is stored in your Xmoment.
26) Click 'Close'. 

Reset Xmoment to factory settings
30) Click on the menu at the bottom right.
31) Click on 'factory reset'.
32) Click on 'Okay'.
33) Click on 'Okay'
34) You are in the home screen.
(Note that Xmoment no longer recognizes voice commands and WiFi network, but is still linked to your Casambi network. You must disconnect Xmoment separately from Casambi). 
connect the Xmoment to your Casambi network;
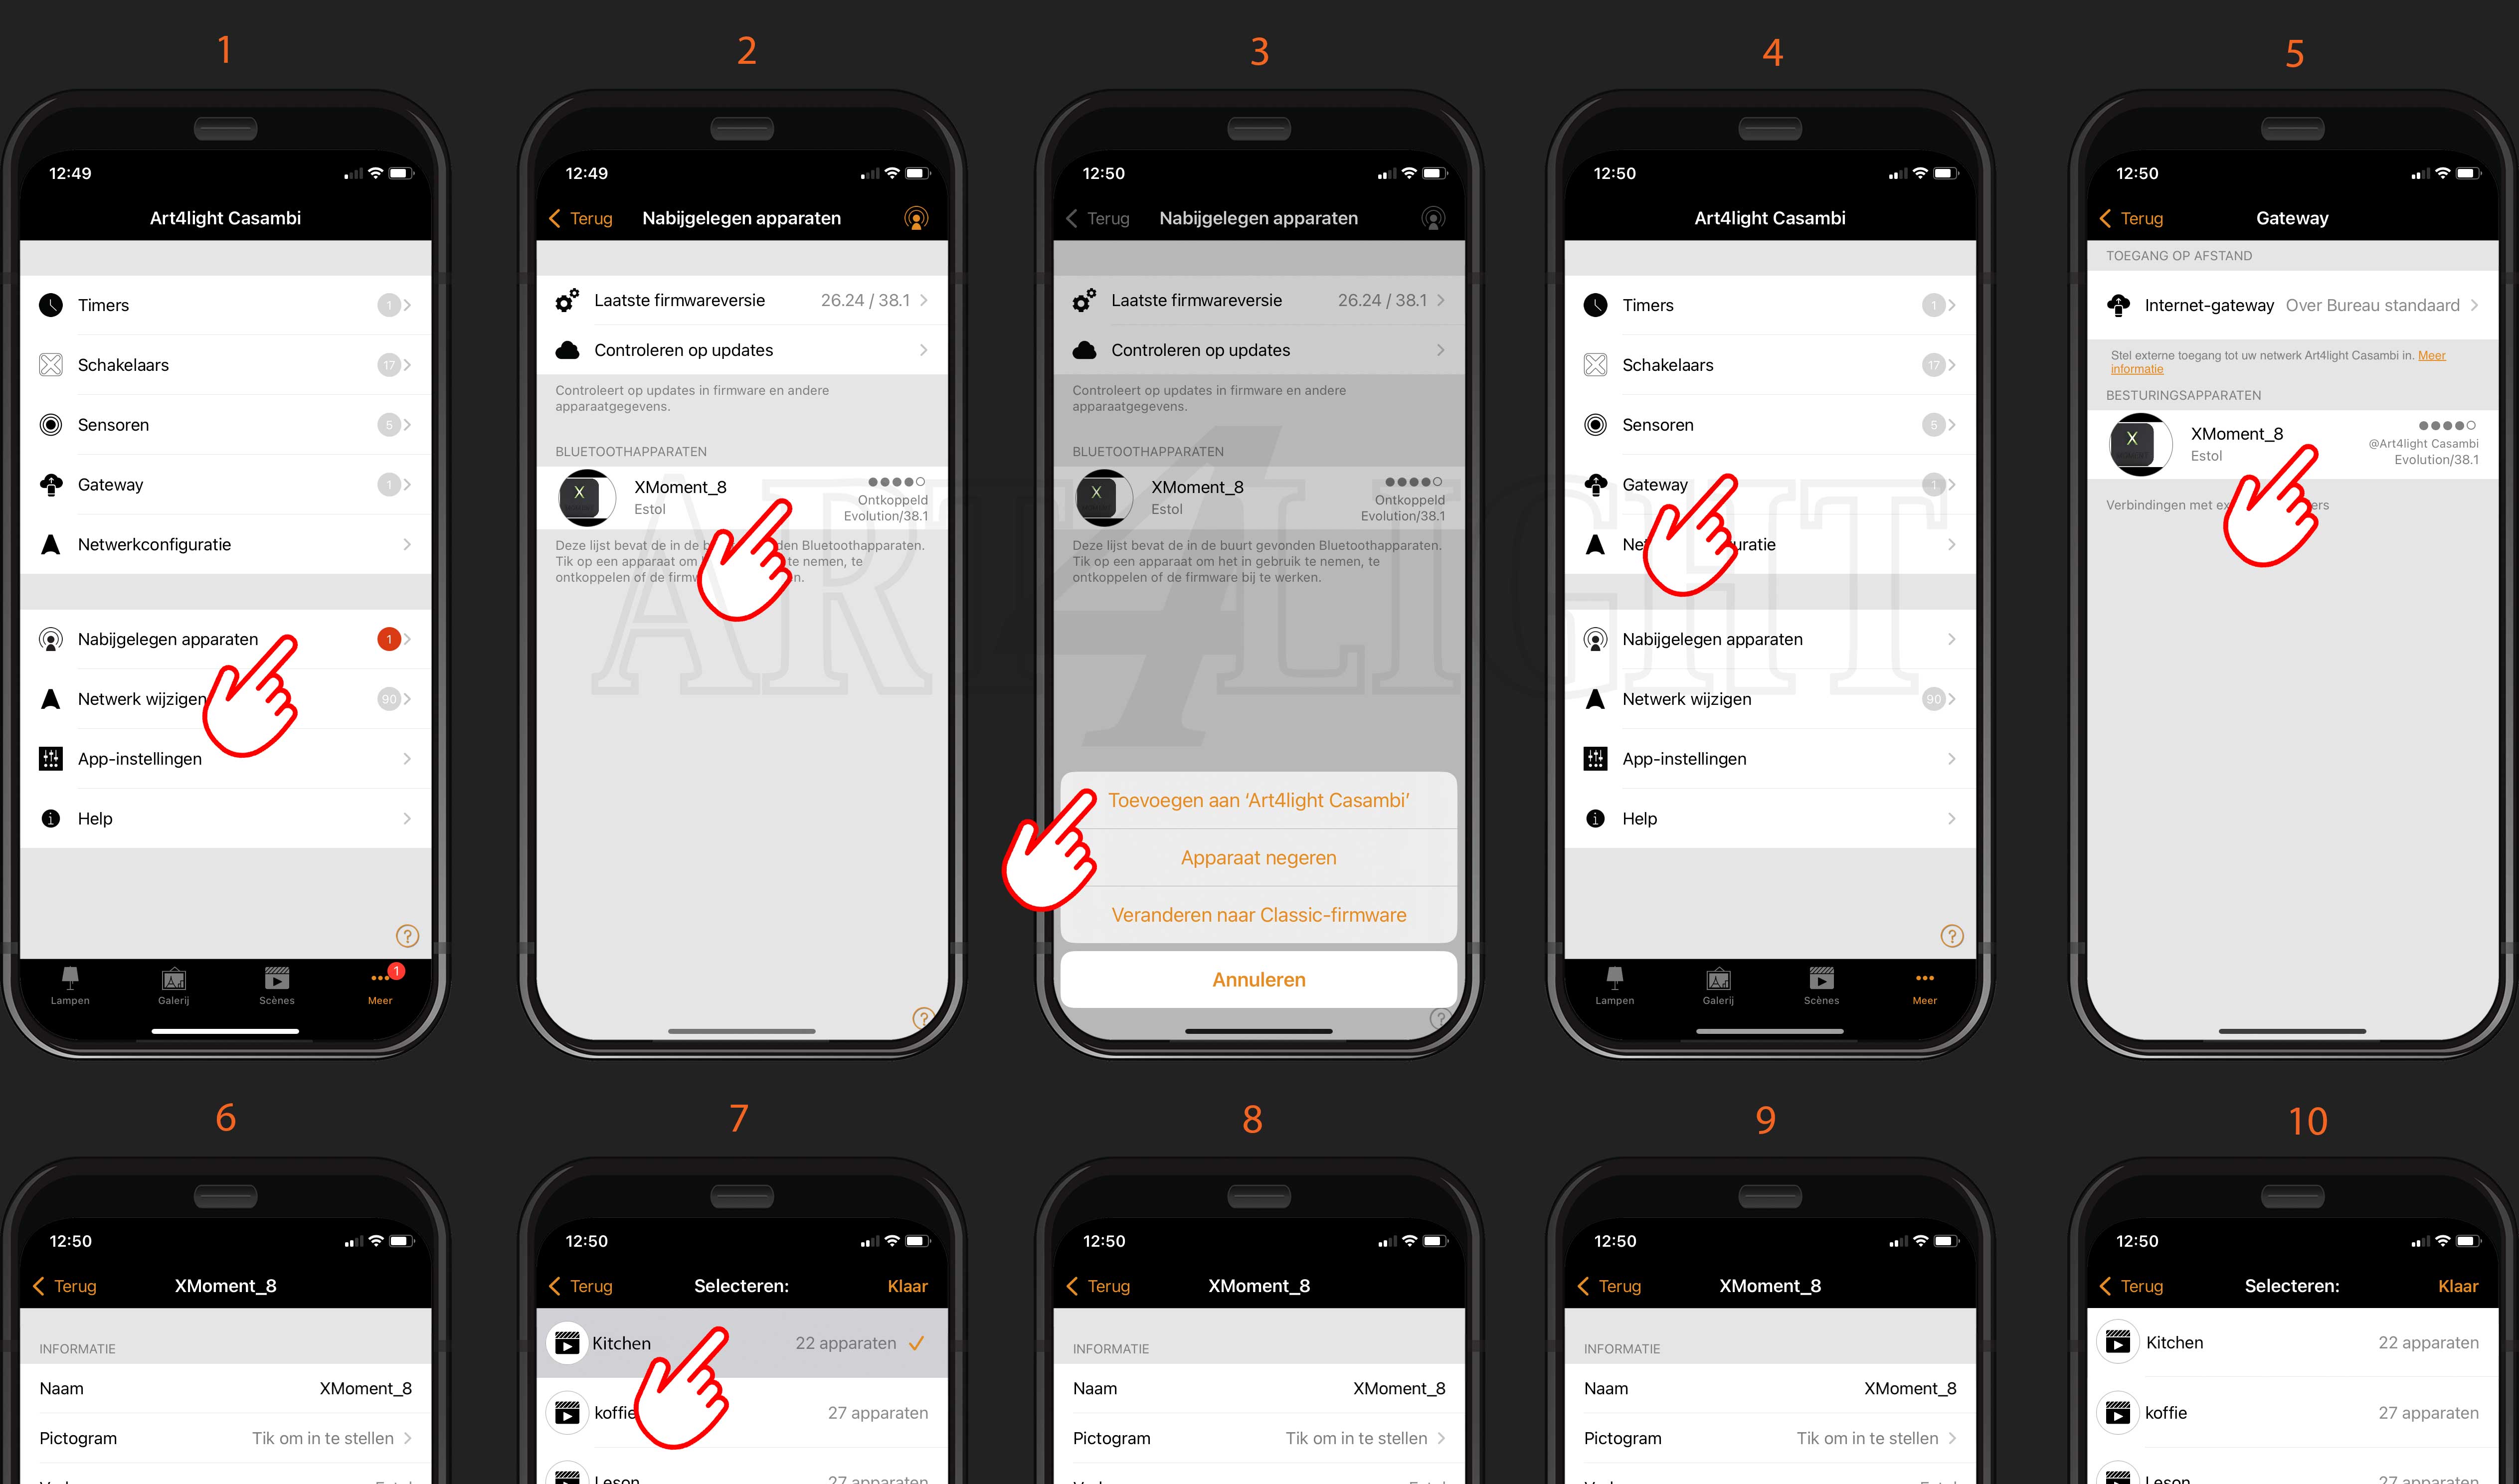
1) Go to 'nearby devices' in the Casambi app.
2) Click on the Xmoment.
3) Add Xmoment to your network, in this example 'Art4Light Casambi'.
4) Look at the 'gateway'.
5) Click on the Xmoment.
6) Click on 'Sprachbefehl 1'.
7) Select the desired scene, in this example 'Kitchen'.
8) You will now see the selected scene on line 1.
9) Click on 'Sprachbefehl 2'.
10) Select a scene, etc. etc. 

Create Bluetooth devices in the Alexa;
1) Download the Alexa app.
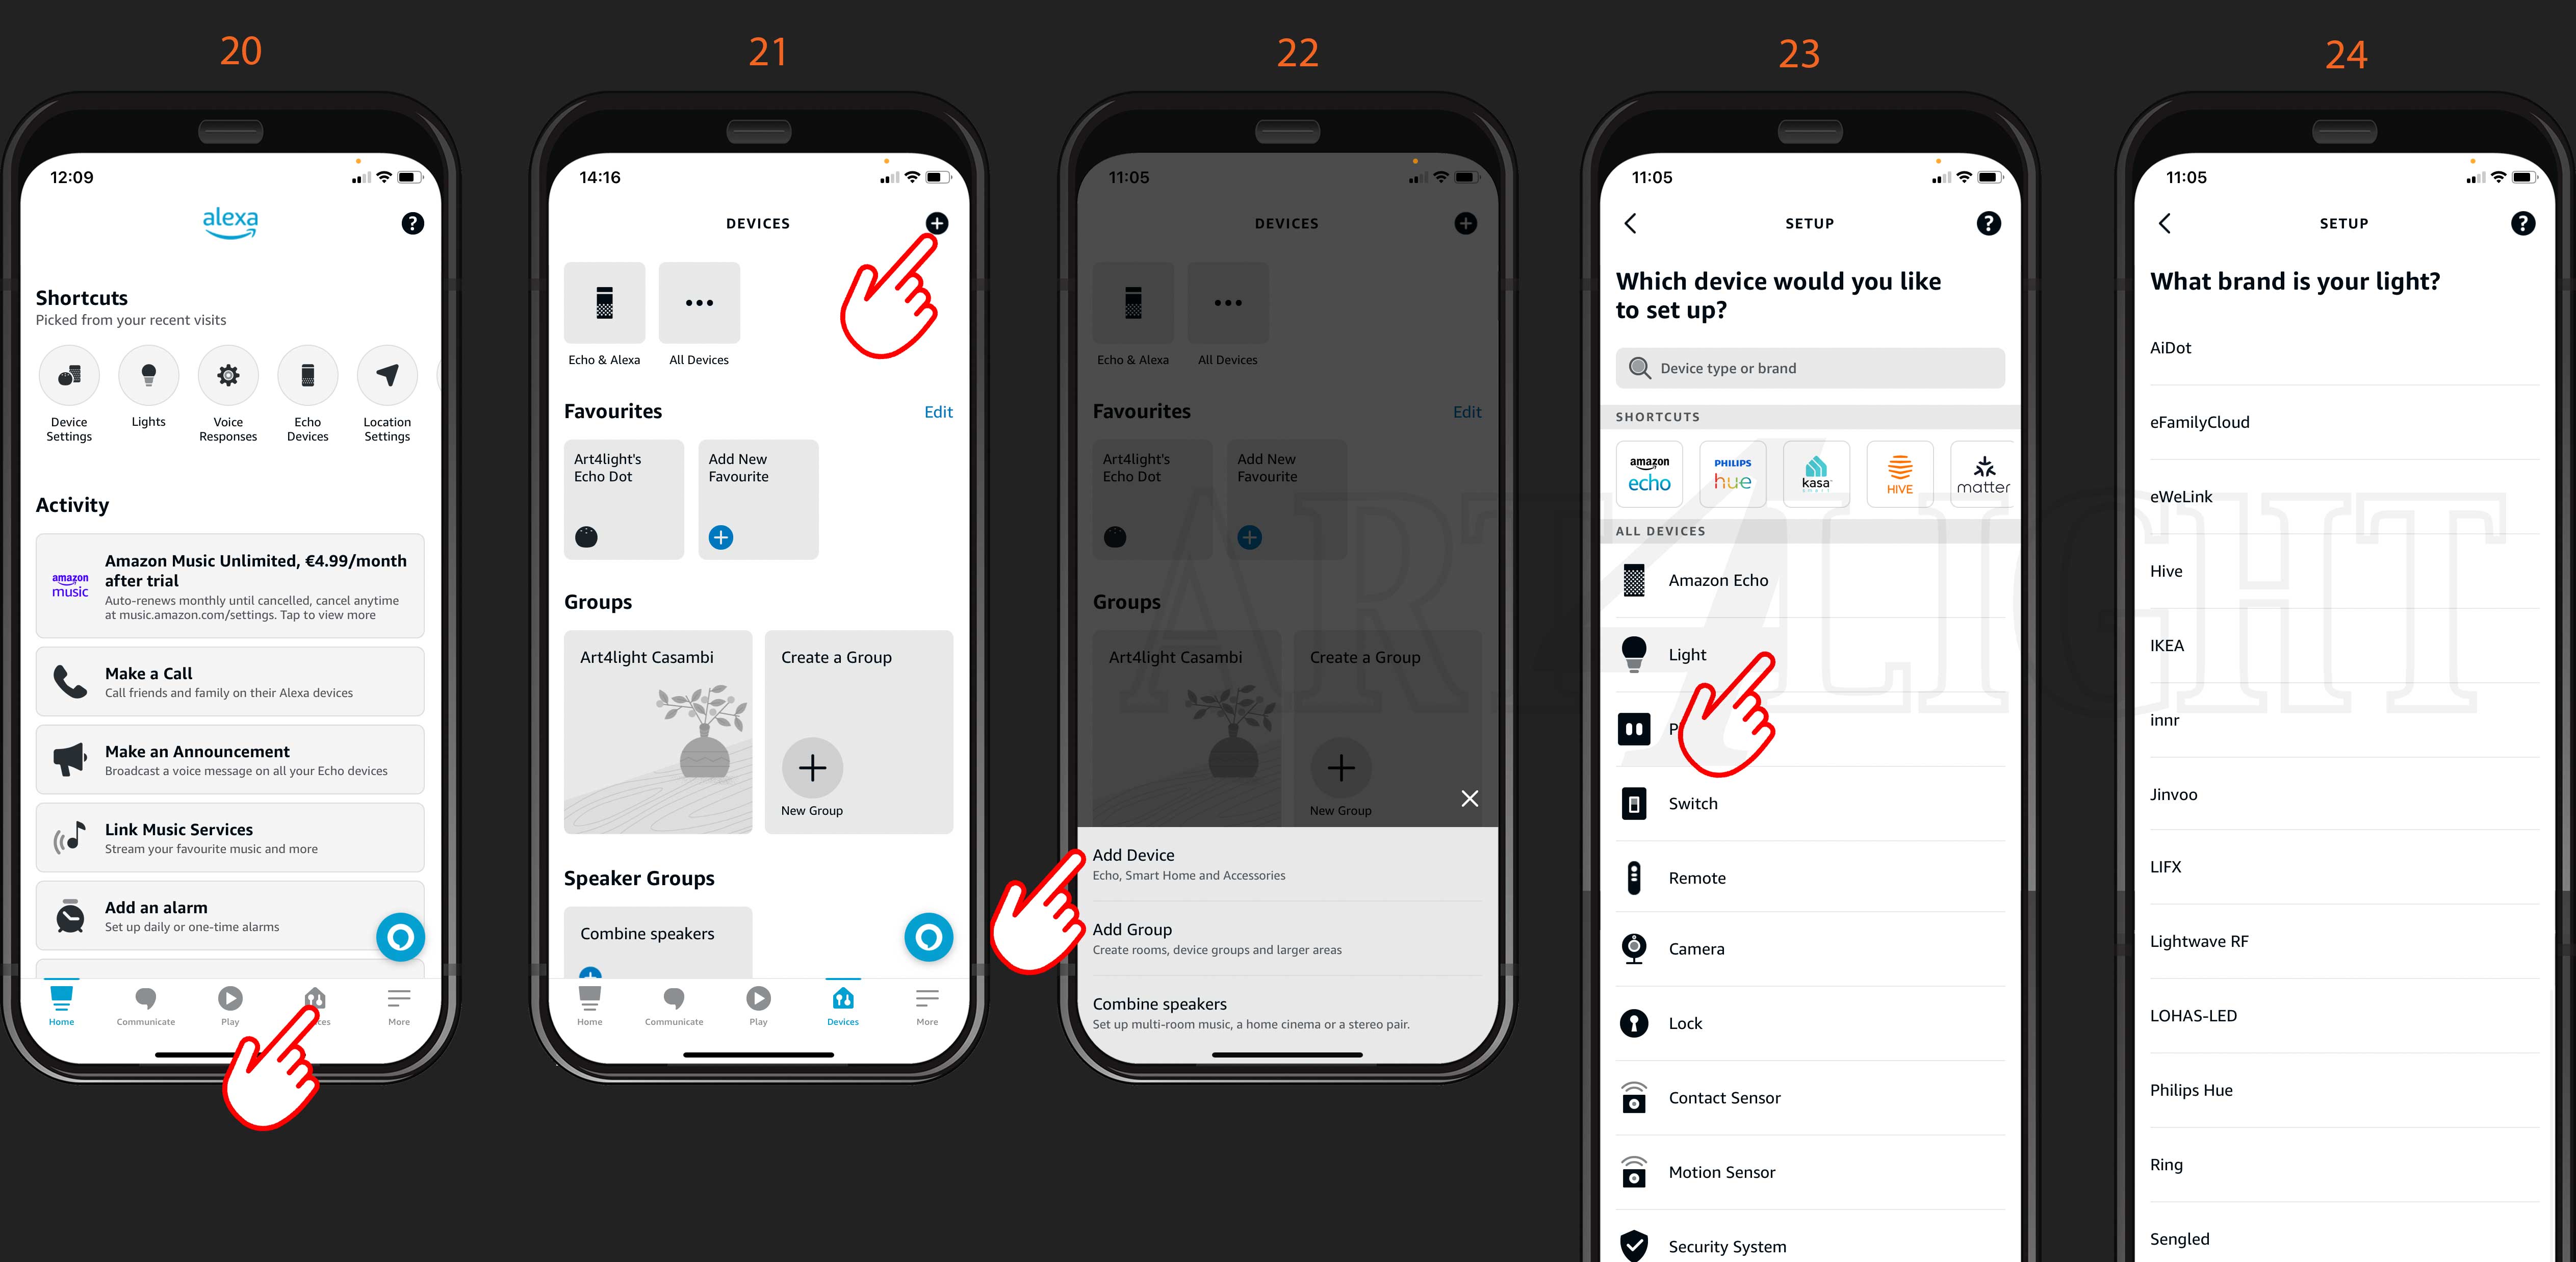
2) Click on 'Devices'.
3) Click on 'create a room'.
4) Click 'next'.
5) Click on 'Customized name'.
6) Enter the name, in this case 'Art4Light Casambi.
7) You enter 'add devices', click on 'next'.
8) Choose your 'Echo dot' .
9) Click 'done'.
10) Here you can see that the group has been created. 

Add voice commands ('Devices') from the Xmoment.
20) Click on 'devices'.
21) Clicks +
22) click on 'add device'.
23) Click on 'light'. (what type of device)
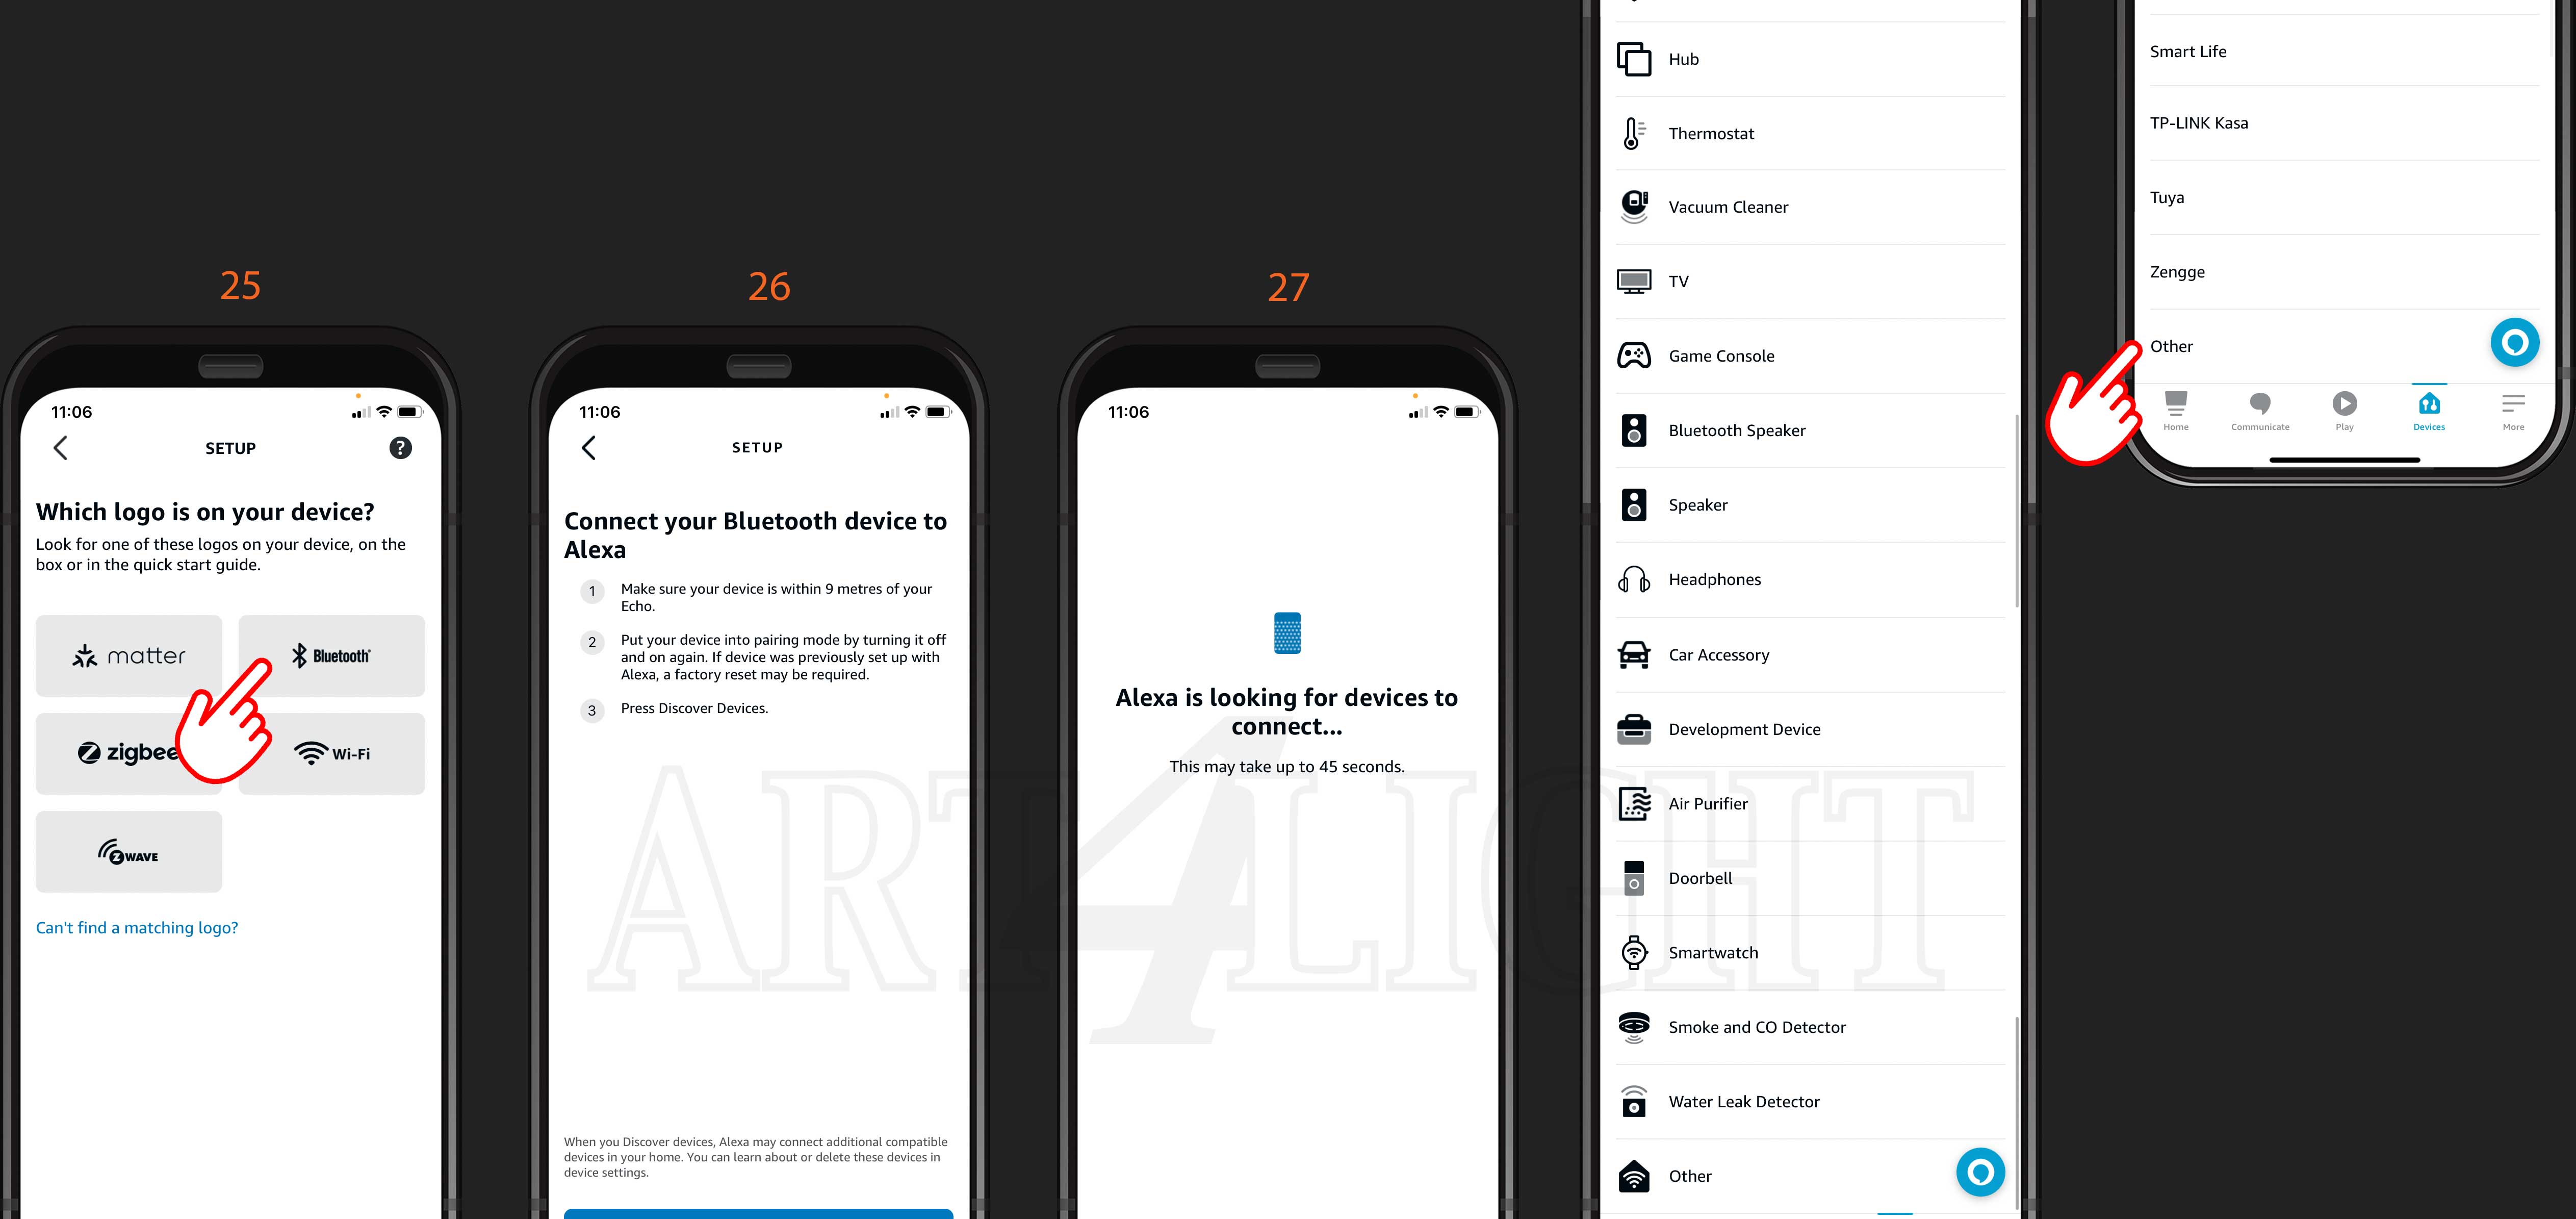
24) Click on 'other'. (what fire)
25) Click on 'Bluetooth'.
26) Click on 'Discover devices'.
27) Amazone will now search (takes 45 sec.)
28) Click 'next'. (In this example, Alexa found 3 devices (voice commands)).
29) Choose a device (voice command) and click on 'setup device'.
30) Choose the desired group. (where is your light).
31) Click on 'continue'.
32) Click 'continue' to add more found devices to groups).
Repeat this for other devices and note that you can also create other groups in the meantime, such as 'Garden'.


